Friday, February 28, 2014

Love Grows on Grandpa's Farm: Barnboard Sign

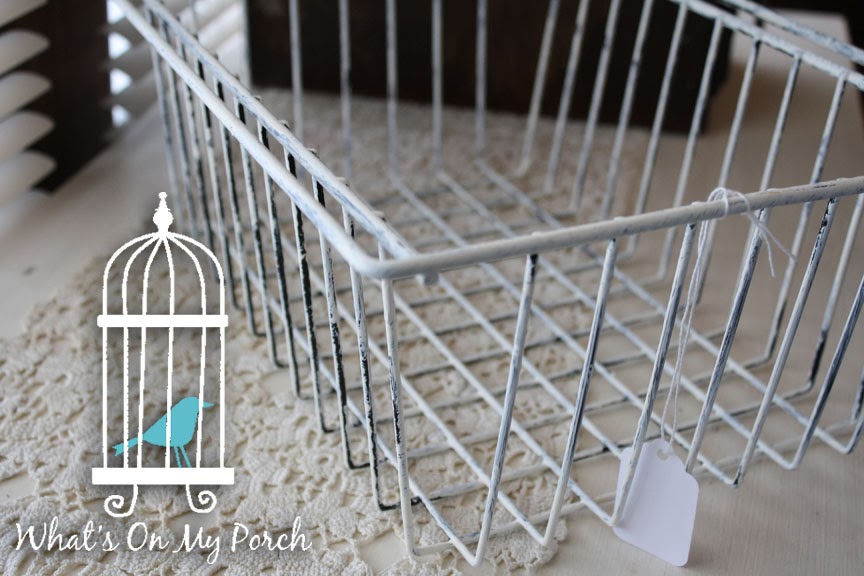
I've mentioned a few times that my dad lives on a farm. And I've also mentioned a few of the items I found while snooping around one day: wire baskets, galvanized buckets, old rusty chains. But my favorite item was this amazing piece of wood. 

It still had the remnants of rusty hinges and a lock attached. The wood was weathered, but tough. It just really reminded me of my dad. So I decided to keep it and make it into a kind of family heirloom that I hope will be passed down from generation to generation.


I decided to make it into a kind of family tree. On the back, I wrote the names of our family, starting with my Great-Grandma Rose whose parents came to America from Germany. She had lots of children, but I only wrote my grandmother's name: Dorothy. Dorothy, too, had many children--all my aunts and uncles, but I only listed my dad, Dave, and my mom, Audrey. After that I listed my husband and I and then our kiddos. I hope the tradition continues and names get added.


On the front I simply painted "Love Grows" which I thought was fitting in keeping with both the farm and family tree themes. 

Now, it just needs Hubby to add a chain to the back so I can hang it on the wall. I know this will be a cherished memory for my kiddos--one of which graduates from high school this year and the other turns sixteen. They have many years of fond memories on Grandpa's Farm, and I think this will be a beloved reminder of that as they grow up and begin families and memories of their own.


My girls are grown up now, but when they were little they enjoyed riding with Grandpa Dave on his tractor (and giving mom a heart attack for fear they would fall).
 
The girls loved the baby kittens.
 
Sisters could always find an adventure exploring grandpa's farm.
 
Our family at Grandpa Dave's farm along with Maggie the border collie.

Wednesday, February 26, 2014

Transfer Images to Flower Pots


Transfer Images to Flower Pots
I recently saw a tutorial on transferring images using Mod Podge and I wanted to try it. The perfect opportunity came in the form of three old terra cotta flower pots that I found on sale at a thrift store. They already had a pretty, timeworn quality, but I was looking for more white and less red. 

Paint
So, I began by painting them with a thin, dry-brushed layer of white. After that I added another layer of gray--just here and there where the red was still poking through.

 
Applying the Graphic
After they were dry, I printed some Graphics Fairy (see link in sidebar) images backwards and then cut them out. I sponged over them with Mod Podge (matte finish) and stuck them to the pots. I messed this part up just a little. I should have cut the paper around the graphic, not just in square, straight lines. I figured this out on the last one.


Dry Overnight
The tough part came next: letting them dry overnight without touching or peeking.

Lightly Wet & Peel
The next day I took them to the sink and lightly dampened the paper with water until I could see the image through it. Then, ever-so-gently, I peeled it away and also rolled it. Peeling seemed to want to take off the image, but rolling away the paper little by little worked, leaving the image behind and (mostly) intact.

The finished product turned out very pretty and has a kind of shabby, vintage, French look that I love! Can't wait to pot some herbs in these pretty planters!

 Transfer Images to Flower Pots!

Transfer Images to Flower Pots


Wire Basket

I also found this cutie patootie wire basket. It wasn't much to look at, but a quick coat of white paint (leaving some black showing through for that chippy look) makes it perfectly shabby!


Sunday, February 23, 2014

A Chalkboard (Cork Board) Of My VERY OWN!

I've seen them on Pinterest. I've seen them on blogs. I've envied them from afar, and now, finally, I
decided to make one of MY VERY OWN! Here is the epic saga of how a girl, injured and alone, managed to turn a thrift store cork board into a dazzling, amazing chalkboard!


Let's begin at the beginning. First, my wrist is injured. I've whined about this before, but I'm hoping it might explain later failures, so pity me, reader. PITY. ME.

With injured wrist, I managed to do the easiest part of this whole fiasco, which was to paint the cork board. I painted the actual cork with two coats of chalk board paint. I have never used it before and it is as fantastic as you've dreamed! However, I believe it was meant for FLAT surfaces. But more on that later.

Then I painted the outside frame white. After it all dried, I decided to "season" it, based on one blog's recommendation. This is where you color with the flat side of the chalk over the entire board, then erase it. This makes it so your mistakes aren't as glaringly obvious, which is a good thing because it was at this point that I began to get CREATIVE--AKA the part where things started going a bit wonky.

A lot of chalkboard how-to's tell us to freehand it. I don't know if they are the descendents of Rembrandt and DaVinci or what, but we mere mortals cannot freehand! So (clever, clever me) I
decided to print out a template and trace it onto the chalkboard using my trusty old willow charcoal technique (in which our heroine colors on the back of her print-out with willow charcoal and then traces the design onto the desired surface, in this case, a cork/chalk board).
This did not go quite so smoothly. Likely because charcoal is black much like, oh I don't know, a chalkboard, perhaps? Still, in the right light I managed to see about two-thirds of my design and decided to take advice from the experts and "freehand" the parts I couldn't see.

This is the part where I was VERY thankful for my ultra-skinny chalk PENCIL. I picked this baby up in the fabric section of a craft store. It's perfect for eentsy beentsy lines. So, I traced over the dark design with a light white. Then I filled it all in. This required much smudging.

The "experts" often said to wet the chalk to make the design stick better and look brighter. I tried this, but only ended up with goopy chunks of chalk stuck to my board. Then my chalk broke. ALOT. So, plan B was to just fill it in with good, old dry chalk and smudge. But my big clumsy fingers were not suitable to the thin lines of my font, so for that part I used a pencil eraser. Smudge-a-rific!

When it was nearly done, I decided to blow away the crumbly chalk pieces and accidentally spit on the board. Yes, spittle. From my mouth. Thankfully, it didn't do too much damage and I was able to keep going, careful to make all my future work spittle-free.

At the end, my design looked like something a really artistic 12 year-old might do. I decided it needed something more... so I added thin highlight lines to the words (again thankful for my ultra-thin chalk pencil).

I guess it wasn't too bad for the first attempt, but I'm still envious of those fancy-schmancy artists out
there who make words into ART. Maybe I'll try again, but probably on a flatter surface (AKA no cork bumpies). In the meanwhile, I'm proud of what I accomplished with my (sob story) injured wrist and broken chalk pieces!  


Friday, February 21, 2014

Painting Old Books: Yes, It's OKAY!

Today I am working with only one arm. Well, mostly. I somehow managed to injure my right wrist about a week ago, but I thought I could get away with using it lightly. After shoveling snow, lifting a dresser and numerous painting, prying, scraping, sanding, mixing, etc., I realize I have no concept of what it means to use it "lightly." And I'm in throbbing pain if I so much as use a computer mouse. So, today I am blogging (mostly left-handed)! 

Here is a project that did further injury to my wrist yesterday (but thankfully not too much).

I bought these vintage books at a secondhand store. They are not exactly classics of literature, so I didn't feel guilty about painting them. I've seen other bloggers paint books and wanted to give it a try. After all, most of my "vintage" (AKA old) books are not the kind I read. They are for decorating. They make pretty shelf displays or bases for candles and other knick-knacks.These were adorable in red and green, but not really the look I wanted. I felt a tiny twinge of guilt about painting them, but since there were about a dozen other colored books at the store, I didn't feel all that bad.

So, I began with a coat of country white satin latex paint on the outside cover, followed by another. I found I could paint the whole thing at once, front and back, if I set the book upright to dry, using the inside pages as a kind of handle to hold while I painted. Afterwards, I realized I could still see the red and green covers that folded around to the inside of the books. So, I painted just a little inside the covers, too.

When they were dry, I added a teensy bit of black to make a dove-gray paint shade. I dipped in my sponge brush, dried most of the paint off by wiping it on a paper towel, then lightly brushed the gray over the white to bring out the linen texture on the cover and embellish the edges.

I think they turned out beautiful! The perfect gray-white base for my little ceramic bird. Very shabby chic!


Friday, February 14, 2014

Clock Shelf Makeover

So, technically for a makeover, I like to show "before" photos. Unfortunately, I completely forgot to take any.

Suffice to say this awesome clock/shelf was plain brown wood. And the photo frames on the sides were empty. You can picture it... I KNOW you can!

I just added a few coats of satin country white paint, then sanded/chipped it to give it that old, worn, vintage, chippy paint look. I also painted the hooks. I've just recently discovered the awesomeness of painted metal hardware and am now officially addicted.

Next, I mixed black acrylic paint with water and brushed it on, then wiped it off so the paint wasn't so bright and shiny, but rather had a vintage, worn feel and voila!

For the photo frames, I cut out a muslin fabric, using the cardboard frame-backs as a template. Then I used my favorite transfer method (Citra Solv!) to transfer the French labels to the fabric and voila again!

The only real trouble I had was trying not to get paint on the glass clock face. It is rounded, convex glass and is glued inside, so I couldn't remove it. I got a little paint on it, but it wiped off easily. Also, I realized after I'd completely finished painting, glazing and chipping that I forgot to paint the clock piece (with the two little triangles on it). Oopsadaisy. Luckily, I was able to get those painted without too much fuss.

I LOVE how this turned out!


Wednesday, February 12, 2014

A Sensual Valentine

Guys are really hard to shop for when it comes to Valentine’s Day gifts. A lot of girls don’t know this, but most guys don’t seem to like flowers or balloons or stuffed animals holding fuzzy hearts that say, “I Love You.” On the flip side, you can’t really get a guy beef jerky or boots for Valentine’s Day, either. Well… you could, but somehow it just doesn’t seem very romantic.


What’s a girl to do? Well, this year I was inspired to explore the five senses: see, hear, touch, taste and smell. I decided to buy a gift that goes with each, but that my hubby would love (or at least laugh at). Here’s what I came up with.


For the gifts: I bought cologne (
Drakkar Noir, my favorite scent), Jelly Bellies (his favorite flavor – juicy pear), a massage bug, an i-tunes gift card and yes, some slinky lingerie. Hey, I’m married, so it’s okay.


You could adjust these to your particular man… maybe he likes Dairy Queen Blizzards (gift certificate) or seeing a movie (instead of undies). Or maybe he likes listening to a mix CD or the feel of a certain massage oil. Get creative.

Get A Massager Here

MORE SENSUAL GIFT IDEAS

Hear: headphones, CD, audio book/Audible account, toy instrument (kazoo, harmonica), drumsticks, a recorded message from you
See: lingerie, book, video game, photograph, movie tickets, blindfold
Smell: cologne, flowers, scented candle, car freshener, plug-in freshener, beard oil
Touch: massage oil, lotion, gloves, massage feather
Taste: candy, chocolates, cookies, coffee, brownies, favorite drink, tea, gift certificate for restaurant


Next, I found some empty tea boxes. This was easy for me because 1. I drink WAY too much tea. We’re talking Mad Hatter craziness and 2. I hoard boxes, among other things. If you don’t have tea boxes, again, get creative. You could buy gift bags or ready-made boxes or use some other food box, like cereal bars (which I also hoard).


Next step was to spray paint them. Otherwise, hubby might think I just stocked up on a tea for his V-day gift. The spray paint didn’t completely cover the caution-yellow, so I went ahead and sponge-brushed a coat of matte acrylic black paint over it. I also decided to open the boxes and paint the yellow parts that weren’t showing. Good thing, too, because apparently the boxes are not all the same, and I also already recycled these as Christmas gift boxes at some point, and there was Santa paper still inside.

Finally, I printed out each “sense” and pasted it to the back of each box. Then I stacked them up and tied them with hemp rope and a sweet handmade card. See? I get to be all creative and cutesy, and he gets some stuff he can actually use. Mostly. I hope he loves it as much as I love him!


UPDATE: People have asked if I could include a printable version of the heart-shaped labels. So, here goes!

Just click the picture you want (red or white). And then right click on it and choose "save picture as" or "print".


Also, here are a few versions of the card for you to choose from.

 *Another Update: The font is Showcard Gothic for anyone who wants to use it.

Looking for more perfect gifts for your Valentine? Check out my Etsy shop!

More Valentine Gift Ideas Here:

http://whatsonmyporch.blogspot.com/2018/02/valentine-gifts-that-he-actually-wants.html