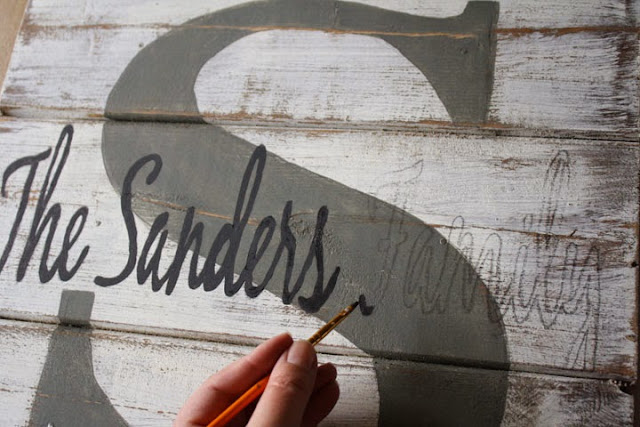
Monogram Pallet Family Name Sign
You've probably seen these wood pallet family name signs on Pinterest. They've got rustic charm, an adorable little monogrammed letter and make a home look cute as a button. You might have even thought about making one yourself. Here's a step-by-step guide to how I made mine.
1. Find a pallet, tear it apart and put it back together. Only prettier. This is where a hubby who is handy with a saw comes in. Or, if you're a warrior chick, you can try it on your own. All I know is that I say, "Three boards long, about 16 x 16 inches square honey" and it happens! I LOVE that man!
 2. Stain your sign. I used a Walnut Minwax stain. Any dark stain would probably do the trick. Let it dry completely. I let mine dry overnight, with a fan blowing on it for part of the time. Just to be safe.
From Amazon
3. Paint one coat of white (or other color) over the stained sign. I go heavier in the middle and leave about an inch border around the edges. Then I wipe some of the paint off my brush for a "dry" brush technique, and I come in from the edges. This gives it a kind of worn look. Let dry. (Again, a fan is handy for this.) It doesn't take very long. Maybe twenty minutes. Have some coffee.
 4. Lightly sand the dry paint to let some of the wood show through. This gives your sign even more of that "vintage" look.
5. FUN STUFF. Not really. Okay, I happen to be a graphic design minor, so
 we have Photoshop on our computer. This is what I used to make my BIG letter "S" and the smaller "The Sanders Family." I created a file that was 16x16 inches (the size of my sign) and used Timmons for my letter "S" and Black Jack for my family name font. I stretched my family name vertically to make it bigger. You can choose whatever fonts work for you. If you don't have Photoshop... which most people probably don't, you can Google how to print a big picture on multiple pages. I found one solution that gets good reviews here.
Find Saral Transfer Paper Here

6. Print the big letter first. To transfer it to the sign, I used Saral transfer paper. I got it on Amazon. It comes in different colors and works like carbon paper. Easy peasy. (If you don't want to use transfer paper, you can color the back of your paper with willow charcoal-Walmart craft section.) I also outlined it in pencil after I transferred it so I wouldn't accidentally wipe it away with my sleeve.
7. Fill in the big letter with paint. I used an acrylic craft paint from Walmart in Pewter Gray. Once it was dry, I sanded it a little to let the wood show through.
8. Finally, it's time for the name. I transferred our family name to the sign and painted it, too, this time in a darker gray color called Pavement. If you have a shaky hand, try using a paint pen (also in Walmart's craft section) to fill in the finer lines. All done!

Want to see more wood signs?
Check out these cute Garden Gates made from reclaimed wood!


No comments:
Post a Comment
Note: Only a member of this blog may post a comment.